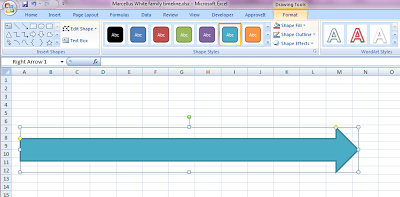
For this timeline I used the Shapes tool in Microsoft Excel and built it myself. You can use any Microsoft Office program to create a timeline graphic, as the Shape tool is available in all of them. For reference this tutorial is built in Excel Office 2007.
To start your timeline click on the Insert tab and then click on the Shapes drop down menu. For the timeline above I started with a block arrow.
When you draw your shape, you will notice that the program automatically opens the Drawing Format tools options. You can adjust the colors of your shape here. I've created this one to match the colors of my blog.
The next step is to insert some text boxes for adding your timeline information. In the example above I used one text above the arrow and one below.
Using the Drawing Tools/Format tab again, I changed the colors of the text boxes to match my arrow. Microsoft has made it easy to choose colors with the Theme Colors options. (Which pleases me because I'm all about the ombre look all over Pinterest.)
Next, I "connect" the two boxes using the Elbow Connector, found in the Insert/Shape tab under Lines.
The Elbow Connector tool makes it easy to connect two shapes to show their relationship. When you hover over the first shape, four red "connectors" will appear, indicating the centers of each side of the shape. Click on the connector that fits your design and while holding the mouse button hover over the connector you want to choose on the second shape and release the mouse button. Now your shapes are linked. You can change the weight of the line under the Drawing/Format tab.
Once your shapes are "connected" with the Elbow Connector they will remain connected no matter where you move the shapes. This is helpful if you need to make more room along your timeline.
Next I group the three shapes (the date box, the elbow connector line and the event box) by Grouping the objects together. Select the three items and then choose the Group option under the Format tab.
The last step is to copy and paste your "group" to create as many events as necessary. Change the information and align them to your timeline arrow.
There is a lot of versatility in shapes, color and format that you can create through your Microsoft programs. I like creating my timelines in Excel because I can put the backup information for the timeline in additional tabs. It suits my OCD. Of course, you can also freehand something like this in Adobe Illustrator or Photoshop, but it is so much easier in Microsoft.
Let me know how this option works for you!


11 comments:
Well wuddayaknow! This is pretty spiffy. Now I just want to build a timeline for SOMEBODY, ANYBODY.
Yes, you do! This lists a lot of steps, but it is really very easy. Let me know how it goes!
I did a practice one - created the boxes but didn't really fill in specific info. And it worked just as easily as you said it would. Writing good directions is an important skill, and you're obviously good at it.
I'm so glad it worked for you! It was really helpful for me to get my mind around the gaps in my ancestor's past. I hope it helps you do the same!
Hi Heather
This is such a classically simple solution. I got quite disheartened with Microsoft when I discovered that Visio's timelines don't work with dates prior to 1900 so I bought some dedicated timeline software, Genelines from http://progenygenealogy.com However the charts it produces are a bit too complex especially when trying to interest other less dedicated family members! This looks easy for them to understand so I will give it a go.
Thanks for this tutorial, Heather! I love the timeline you created, and appreciate the clear, step-by-step directions and illustrations. What a great tool for finding gaps and seeing correlations between things. I can't wait to try it for myself!
Thank you Shelley and Historian! Please let me know how it works out for you.
thans, this is great, I can't wait to try it.
Thank you, Diane. Let us know how it goes!
Great look and feel on this. Thanks for sharing!
Thanks, Joe!
Post a Comment